
Pangolin, Your Self‑Hosted Tunneled Reverse Proxy with Identity & Access Control
Overview
Pangolin is an open‑source, self‑hosted tunneled reverse proxy with identity and access control. It lets you securely publish private services over encrypted WireGuard tunnels without opening inbound ports on your LAN. It is well suited for remote access to home‑lab apps, IoT, internal dashboards, and team services. Pangolin is also known as a self-hosted variant of a cloudflare tunnel.
Been running it for almost a year now and its probably the best self-hosted project of 2025.
Key capabilities
| Area | What you get |
|---|---|
| Identity | Built‑in user accounts, SSO via OIDC, passkeys and TOTP |
| Access control | Roles, resource‑level rules, IP and path restrictions, temporary shares |
| TLS & domains | Automatic certificates with Let’s Encrypt, custom domains and subdomains |
| Networking | Site‑to‑site or client tunnels over WireGuard, no public exposure of origin |
| Admin UX | Web dashboard for orgs, sites, resources, audit and logs |
| Extensibility | Runs behind Traefik, works with security middlewares like CrowdSec and geoblocking |
Installation
Prerequisites
- A Linux host with root or sudo. Ubuntu 22.04 LTS or later is a good choice.
- A domain you control. Plan a dashboard hostname such as
pangolin.example.com. - Public reachability on TCP 80 and 443 for HTTP challenge and HTTPS. If you enable tunnels, keep UDP 51820 open.
- Optional but recommended: an email address for certificate registration and SMTP settings for password resets and invites.
Quick install
wget -O installer "https://github.com/fosrl/pangolin/releases/download/VERSION/installer_linux_$(uname -m | sed 's/x86_64/amd64/;s/aarch64/arm64/')"
chmod +x ./installer
sudo ./installer
During setup you will be asked for the base domain, the dashboard hostname, and whether to enable the tunnel components. You can disable public sign‑ups and restrict org creation if this will only be used privately.
First‑run checklist
- Point DNS for your dashboard hostname at your server’s public IP. Use an A record for IPv4 and AAAA for IPv6.
- Browse to the dashboard URL and create the first admin account.
- In Settings, add SMTP so invites and password resets work.
- Create your first Organization
CrowdSec hardening for Pangolin (with Traefik)
CrowdSec inspects logs to detect abusive traffic and produces ban decisions. When combined with Traefik’s CrowdSec bouncer middleware, those decisions are enforced at the edge so bad IPs are blocked before they hit your apps.
The high‑level flow is:
- Traefik writes access logs.
- CrowdSec ingests those logs, runs scenarios, and creates decisions.
- The Traefik bouncer queries the Local API (LAPI) and denies requests from banned sources.
Step 1. Install CrowdSec on the same host as Traefik
curl -s https://install.crowdsec.net | sudo sh
sudo systemctl enable --now crowdsec
sudo cscli hub update
Install useful collections and parsers for reverse‑proxy traffic.
sudo cscli collections install crowdsecurity/traefik
sudo cscli collections install crowdsecurity/base-http-scenarios
sudo cscli parsers install crowdsecurity/http-logs
Step 2. Point CrowdSec at Traefik access logs
Confirm Traefik access logs are enabled. If you manage Traefik via a static file, you should have something like:
# /etc/traefik/traefik.yml (snippet)
accessLog:
  filePath: "/var/log/traefik/access.log"
  bufferingSize: 0
Then add an acquisition file for CrowdSec:
# /etc/crowdsec/acquis.yaml (snippet)
filenames:
  - /var/log/traefik/access.log
type: leaky
labels:
  type: traefik
Reload CrowdSec to pick this up:
sudo systemctl restart crowdsec
Validate ingestion:
sudo cscli metrics
sudo tail -f /var/log/traefik/access.log | sudo crowdsec -t
Step 3. Create an API key for the Traefik bouncer
sudo cscli bouncers add traefik-bouncer
Copy the displayed key for the next step.
Step 4. Enable the CrowdSec bouncer in Traefik
You can use the official Traefik Plugin Bouncer. Enable it in the static config and reference it from a dynamic middleware.
Static configuration:
# /etc/traefik/traefik.yml (snippet)
experimental:
  plugins:
    crowdsec:
      moduleName: github.com/crowdsecurity/traefik-plugin-crowdsec
      version: v1.4.0
Dynamic configuration middleware referencing your LAPI and bouncer key:
# /etc/traefik/dynamic/crowdsec.yml
http:
  middlewares:
    crowdsec-bouncer:
      plugin:
        crowdsec:
          crowdseclapiurl: "http://127.0.0.1:8080"
          crowdseclapikey: "<PASTE_YOUR_BOUNCER_KEY>"
          enableFallbackRemediation: true
          forwardedHeadersTrustedIPs:
            - "0.0.0.0/0"
Attach the middleware to your Pangolin routers. If Pangolin manages Traefik for you, use its supported method for injecting custom middlewares. If you control Traefik labels on Docker services, the pattern looks like this:
# docker-compose service labels example (attach middleware at router level)
labels:
  traefik.http.routers.myapp.rule: Host(`app.example.com`)
  traefik.http.routers.myapp.entrypoints: websecure
  traefik.http.routers.myapp.tls: "true"
  traefik.http.routers.myapp.middlewares: crowdsec-bouncer@file
Reload Traefik after adding the plugin and middleware:
sudo systemctl restart traefik
Step 5. Verify detections and decisions
- Trigger a simple scenario such as an HTTP scan from another host, for example by running a quick path fuzz with
ffufor repeatedly requesting non‑existent paths withcurlin a tight loop. - Check CrowdSec decisions:
sudo cscli decisions list
- Confirm blocks in Traefik logs or by seeing HTTP 403 from the bouncer.
curl -i https://app.example.com/nonexistent
Optional hardening
- Enrich CrowdSec with GeoIP and apply country‑based policies through scenario packs.
- Add rate‑limit scenarios tuned to your apps.
- Export ban lists to firewalls using the blocklist mirror if you also want network‑level drops.
Operations: updates, backup and observability
- Update CrowdSec and the hub regularly.
sudo apt update && sudo apt upgrade -y
sudo cscli hub update
sudo cscli upgrade
- Back up configuration:
/etc/crowdsec,/etc/traefik, and Pangolin’s compose or installer directory. Persist/var/lib/crowdsec/data/to retain history. - Expose metrics to Prometheus. CrowdSec ships a Prometheus endpoint on
127.0.0.1:6060by default; Traefik can expose metrics as well. Build a simple Grafana board for bans, decisions per scenario, and HTTP codes.
Creating a Site
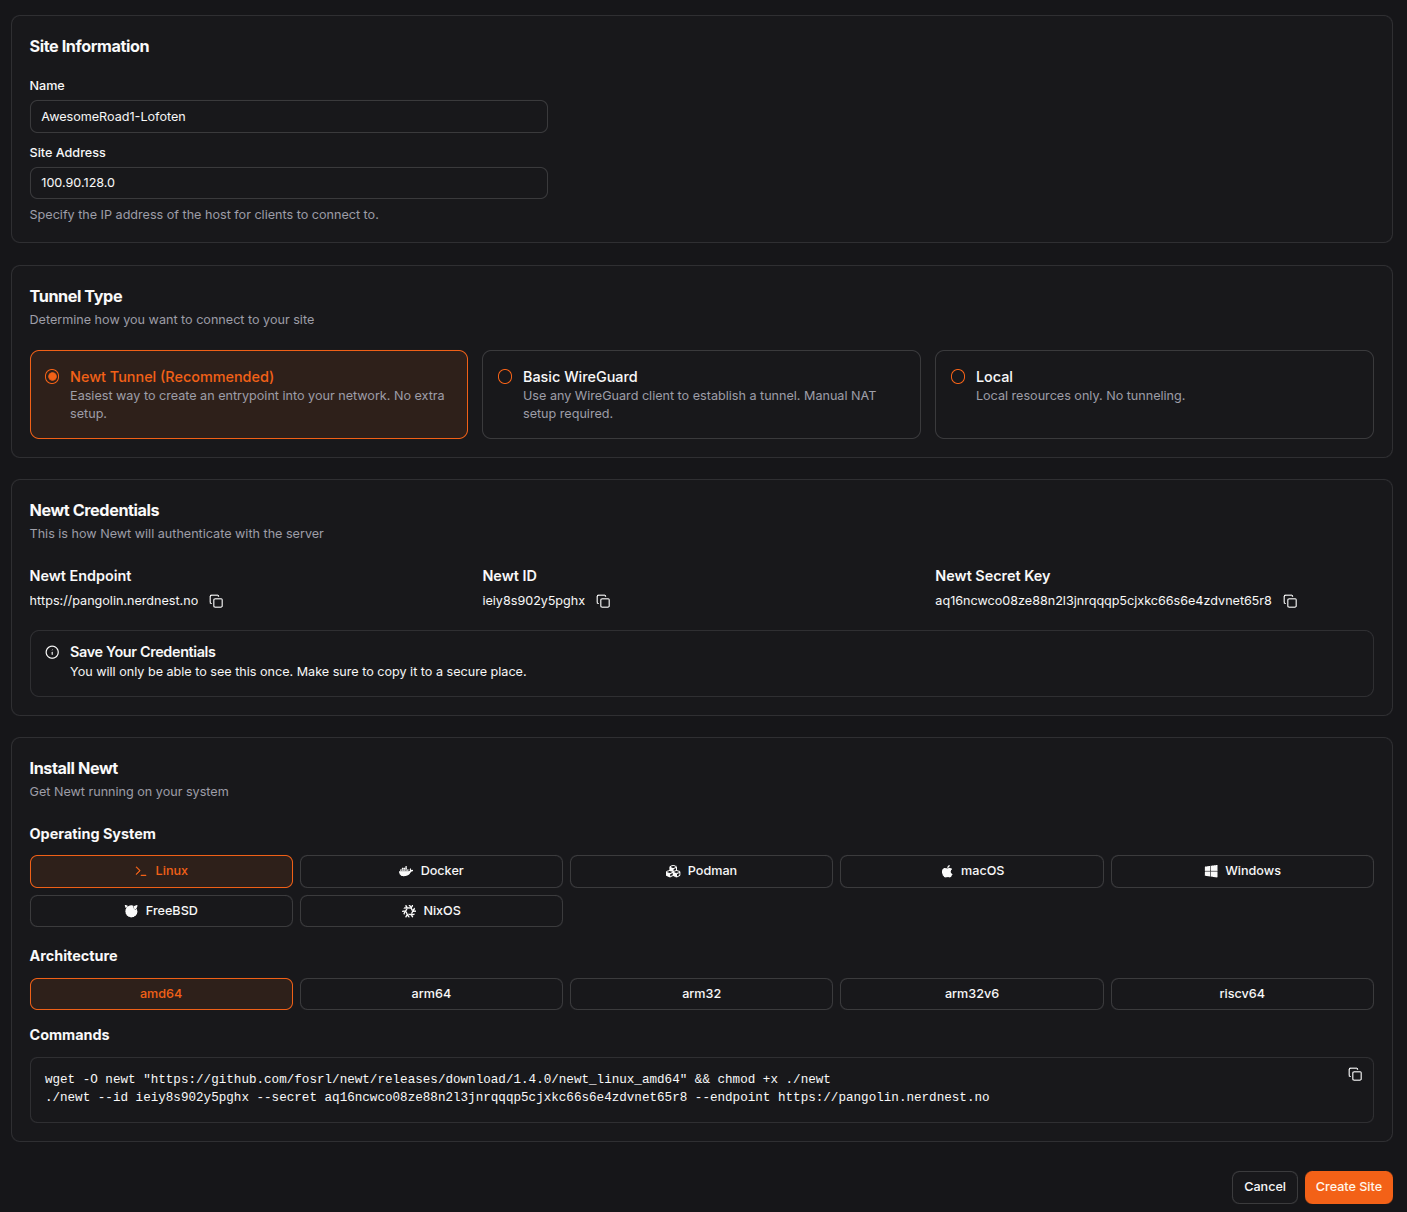
Navigate to Sites in the side bar and click on Add site.
Give it a name and select Newt Tunnel.
In this example I called it AwesomeRoad1-Lofoten with the name schema <address>-<location>
Note down the Newt Endpoint, Newt ID and Newt Secret Key
On the last section of the page you can decide in what flavor you want the newt client.
Favors come in OS, Containers and Architecture.
For sake of this guide, we are going to run the linux_amd64 binary version.
Click Create Site .
Installing Newt Client
Newt is Pangolin’s lightweight WireGuard client for connecting remote devices to your Pangolin instance.
- Download Newt from the official releases page for your OS/architecture.
wget -O newt "https://github.com/fosrl/newt/releases/download/1.4.0/newt_linux_amd64" && chmod +x ./newt
- Start the client to establish the tunnel with the
Newt Endpoint,Newt IDandNewt Secret Keyvalues you noted down.
newt --server <ENDPOINT> --id <ID> --token <SECRET>
- Verify output from Newt and the
Sitespage in Pangolin.
INFO: 2025/08/08 15:11:43 Newt version 1.4.0
INFO: 2025/08/08 15:11:43 Websocket connected
INFO: 2025/08/08 15:11:43 Requesting exit nodes from server
INFO: 2025/08/08 15:11:43 Received ping message
INFO: 2025/08/08 15:11:43 Received registration message
INFO: 2025/08/08 15:11:43 Connecting to endpoint: pangolin.nerdnest.no
INFO: 2025/08/08 15:11:43 Initial connection test successful!
INFO: 2025/08/08 15:11:43 Tunnel connection to server established successfully!
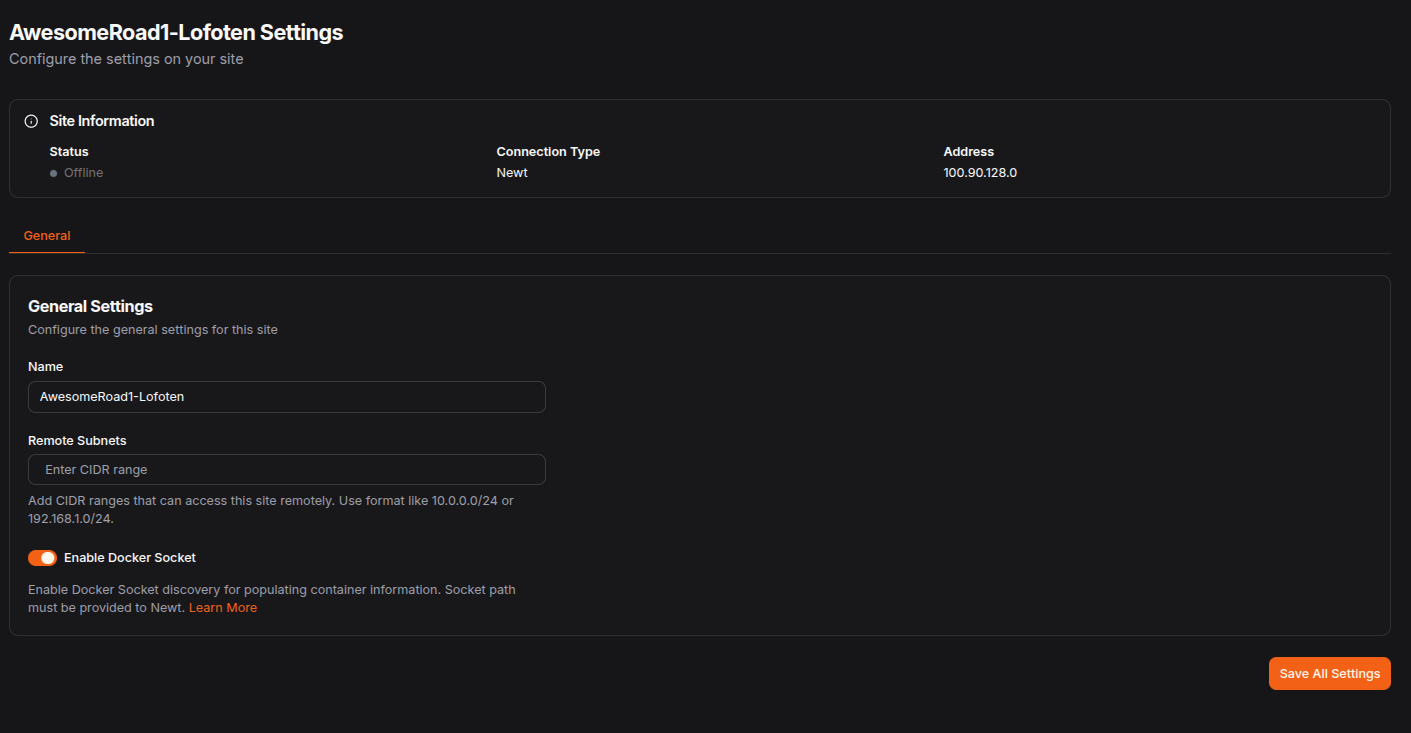
Adding a Resource
Resources in Pangolin are the services or applications you want to publish securely through the proxy.
Configure domain to be used
Under domains you can add a domain you want to use for your site.
It is advised to use a Wildcard Domain, that way you don’t need to add the A record in your DNS for each added resource.
By clicking on Add Domain you can fill in tun.example.com as domain.
That way we can create subdomains like resourceName.tun.example.com and you don’t need to create a wildcard for a complete domain.
It will give you the following two A records you should add to your domains DNS.
| Type | Name | Value |
|---|---|---|
| A | *.tun.example.com | Pangolin Server IP Address |
| A | tun.example.com | Pangolin Server IP Address |
Steps to Add a Resource
- Navigate to the Resources in Pangolin
- Click Add Resource and provide:
- Name: Friendly name for the service (e.g., PVE-Dashboard)
- Site: Select the site where this resource is located
- Resource Type: Select
HTTPS Resource - Domain: Enter the full domain you want to use for this resource (e.g., pve-dash.tun.bendiksens.net)
- Mark the object
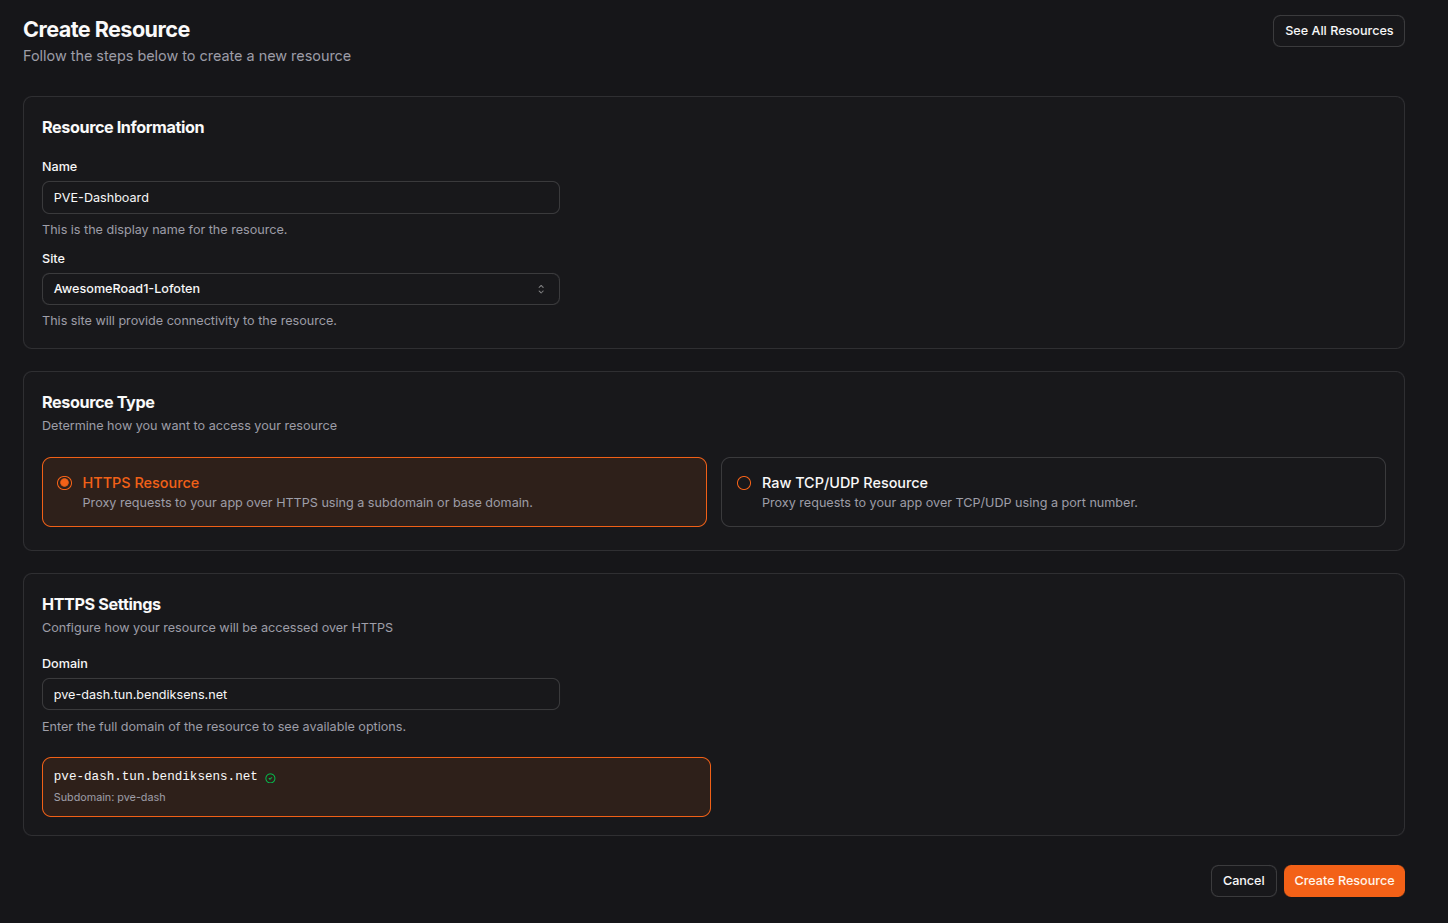
- Click Create Resource
- Provide the following settings to created resource:
- Method: http
- IP / Hostname: The private address of the service (e.g.,
192.168.0.221) - Port: port of the service (e.g.,
5799) - Click
Add TargetandSave All Settings
- Click on Authentication tab
- Under
Users & Rolesmake sure that the flag forUse Platform SSOis enabled. This will make sure that a logged in user to Pangolin is needed to access the resource. Turn this off if you want it to be public accessible. - Click
Save Users & Roles 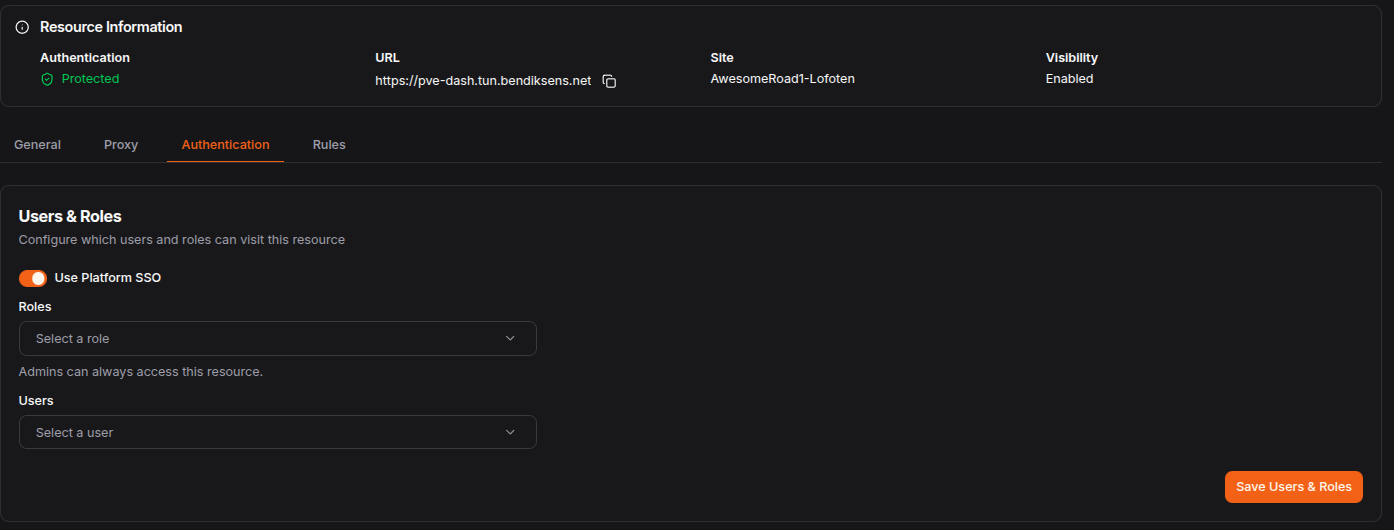
- Under
- Test the public hostname to confirm the resource is accessible and protected by your chosen access controls.
Daily use of Pangolin
- Access the dashboard and sign in with your admin account.
- Create Sites for each environment such as Home, Lab, and Office.
- Add Resources for each internal service and choose how they are exposed: direct reverse proxy or via tunnel.
- For tunnels, install the client on edge hosts and enroll them. Distribute access using roles.
- Review audit logs regularly and ensure CrowdSec continues to ingest Traefik logs after upgrades.
Troubleshooting
- Certificates are failing: confirm DNS is correct and TCP 80 is reachable for the HTTP challenge. Check the ACME logs in the proxy.
- Bouncer shows no decisions: verify
crowdseclapiurland the API key, and that port 8080 is reachable from Traefik. Runsudo cscli metricsandsudo journalctl -u crowdsec -e. - CrowdSec parses nothing: confirm your acquisition file path to Traefik’s access log and that access logging is enabled. Use
sudo crowdsec -twith a tail of the log to see parser status. - Traffic allowed despite decisions: ensure the bouncer middleware is attached to the correct routers and entrypoints, and that there are no typo differences between
@file,@docker, or provider namespaces.
With Pangolin handling identity and tunnels, and CrowdSec enforcing reputation at the edge, you gain a defense‑in‑depth posture that blocks noisy attackers early while keeping private origins dark.
You can read more about Pangolin in there original Wiki or on Github